THIS PORTFOLIO IS DEDICATED TO GOOD OLD AMERICA.

TO DO THIS YOU MUST HAVE A PICTURE OF AN AMERICAN FLAG AND YOU MUST COPY THAT LAYER BY PRESSING CTRL>J AND THERE SHOUKLD BE ANOTHER LAYER EXACTLY LIKE THIS ONE, AFTER THAT YOU WANT TO MAKE ANOTHER LAYER WITH A BLACK BACKGROUND, THEN YOU ORDER THE LAYERS SO THAT THE COPY IS ON TOP, THE BLACK LAYER IN THE MIDDLE AND THE FIRST AMERICAN FLAG ON THE BOTTOM, THEN WHAT IS GOING TO HAPPEN IS YOURE GOING TO GO TO THE BLACK LAYER AND CREATE A TEXT BOX BY CLICKING THE T ON THE LEFT TOOL BAR, THEN YOU CLICK AND SPREAD OUT THE BOX AND THEN TYPE FREE, THEN PRESS ENTER AND SPACE A COUPLE TIMES THEN TYPE SINCE AND THEN DO THE SAME THING BUT TYPE 1776, THEN WHAT YOU WANT TO DO WHILE THIS IS GOING ON IS GET A PICTURE OF A RIFLE OFF THE INTERNET AND OPEN IT IN PHOTOSHOP BY CLICKING FILE THEN OPEN, THEN YOU MUST SELECT THE GUN WITH THE QUICK SELECT WHICH LOOKS LIKE A PEN AND SOME DASHES MAKING A SHJAPE ON THE LEFT HAND TOOLBAR, THEN WHAT YOU WANT TO DO IS select it and then copy and paste it onto the original oiece we were working on. ok and then what you want to do is paste it onto a nother layer but then putit onto the layer that has the text, you do this by being on the layer with the gun and then going to the layer drop down menu and at the almost very botom it will say merge down and then click merge down and then what you want to do is press CTRL>T and then shape it to where it is a decent size next to the letters, then what you are going to do is copy and paste it again so that it is on a different layer and then adjust it and merge it down again so that two guns look like they are crossing each other, then what you want to do is create a nother layer by going to the bottom right of photoshop and under all the layers you have you will see a little square that looks like it has been folded over and then click it so you have another layer above the layer with the words and the guns then what you want to do is type 50 states of freedom and then put it to where it is just above the since and then what you do is click on that T that is next to the color of the text and then click it and then click the one that says flag and that will make it look like a flag and then what you want to do is adjust it to the size you want and then merge that layer down with the steps i just told you. then what you want to do is make sure you have all the text on one layer and the guns on that same layer and then make sure the american flag is the top layer and then under the layer with all the text is a black layer and then what you do is go to the top layer which is the american flag. and then go to the layer drop down menu and then what you do is click the one that says create clipping mask and then what you should have is a picture with all the things filled in with the american flag. and then if you have al these things you are done.
A TRIBUTE
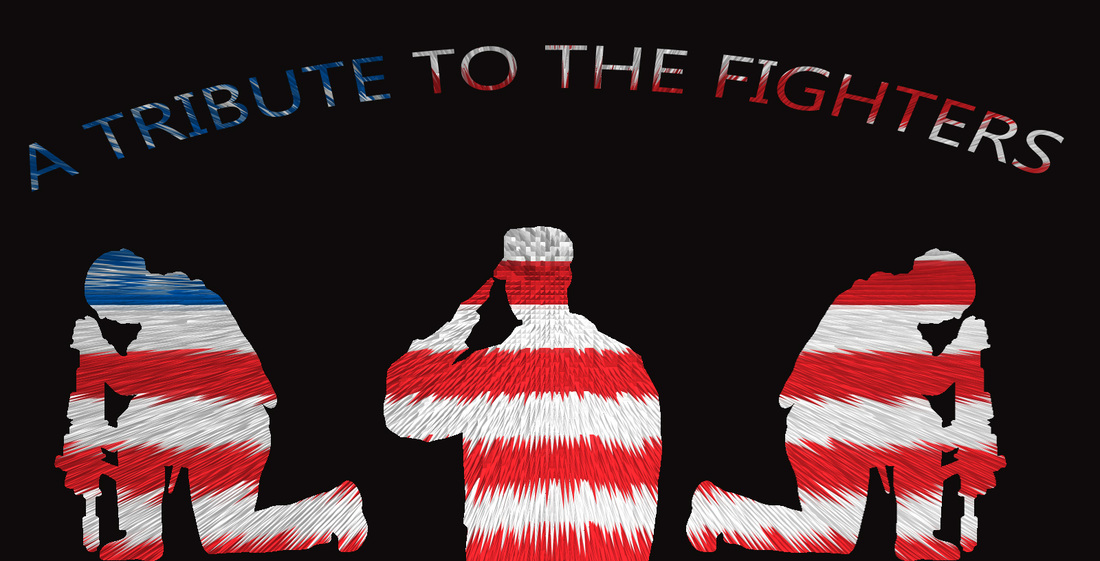
ok so for this you want to find a pic of the american flag on the internet and then what you want to do is save it and then go to photoshop and open it up by clicking file>open and you should be able to find that picture of the american flag, then what you want to do is create a copy of that american flag layer by pressing ctrl then j and then there should be two layers both with the american flag.]then ypu create a new layer and ou fill it with black by setting the square on theleft tool bar to black and then press CTRL>backspace and then put it in the middle of the two american flags. and then you get a picture of and american soldier and then save it and then opn it and then you use the select tool to select it and then copy and paste it onto the black layer, it will create a new layer. then you press control t to adjust it and puit the soldier right in the middle, and then you get a picture of a soldier kneeling or praying and then you download it, open it and then select it and copy and paste it and transform it to put it just under the stars of the american flag.
then what you do is make copy and paste the soldier kneeling agian and adjust it to make it look just like a mirror imag of the other man. Then what you do is merge these layers by going to the layer drop down menu and then select merge layers until all the soldiers are on one layer, then you create a text box by clicking the t on the left tool bar. and typing a tribute to the soldiers and then pressing the t to arc it and then adjust the arc and then adjust it and then you merge that layer down and then you go to the american flag layer and then you go to the layer drop down men and then stylize and then press extrued and put it to pyramids and then you extrude it and then put a clipping mask as described in the previous write up. and then you are done,.
then what you do is make copy and paste the soldier kneeling agian and adjust it to make it look just like a mirror imag of the other man. Then what you do is merge these layers by going to the layer drop down menu and then select merge layers until all the soldiers are on one layer, then you create a text box by clicking the t on the left tool bar. and typing a tribute to the soldiers and then pressing the t to arc it and then adjust the arc and then adjust it and then you merge that layer down and then you go to the american flag layer and then you go to the layer drop down men and then stylize and then press extrued and put it to pyramids and then you extrude it and then put a clipping mask as described in the previous write up. and then you are done,.
the beating heart of america

for this you must get a pic of a heart and create the clipping mask with the american flag wiith the instructions in the previous write up and then you get a picture of hands and then create a video timeline and then you make a new lyer, then put a stroke on the heart and then you go to filter and then distort and then you make a new layer wht the same heart and then you put a stroke on it but then spherize it and then do anotehr one like that and you should have 6 layers and boom you should have a gif just like this one.

For this piece you get a picture of an american flag, and then create a clipping mask by to make a clipping mask you have a background (american flag) then create a copy of it and make a text layer over the copy and create a clipping mask by going to the layer drop down menu and clicking create clipping mask and select the word america with the american flag clipping mask. return to the other piece. and then you edit the text to look wavy by clicking the T on the hill next to the color of the text, then you make that into a single frame of a gif, top make a gif hyouy go to view, then click timeline, then create timeline then click the 3 little squares on the bottom left of that box or the screen. then you click the new layer button. the one that looks like a paper folded at the corner and then you do the same thing but type the thing on the second slide instead of the first. make sure to hide the stuff from the first layer to not make it all clash together. do this with all of the slides leading up to the obama slide. then onbce at the obama slide you make a new layer and fill it with white. then you get a picture of obama and open it and select it then copy and paste it onto this layer. then you type i support this message in blue next to Obama and then you're done with that slide. then you get a silly pic of George Bush and select and copy and paste to the new layer with a white background and then type But I dont next to him and then you are done bro.
graffiti
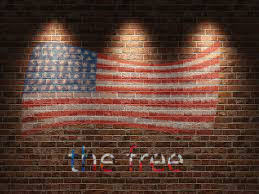
ok first you must get a brick wall and then you get a picv of the american flag and then you you put a wave distort filter and then you put a ripple filter do all these things by going to the filter drop down and selecting tduistort and sistort it as you please, then you make it look like the wind is blowing it and then you copy and paste that onto this brick wall and you get the eraser tool and make sure it is at 49 percent opacity and then make it look like it is graffiti and then you create a clipping mask of the words the free on a diffeent file as described in my first portfolio write up and then you do the same thing with the eraser to make it look like it is graffiti and then you adjust it as you please and then you should be good.
i love america

first make a black background
in another piece, make a clipping mask of the american flag on the word america.
to make a clipping mask you have a background (american flag) then create a copy of it and make a text layer over the copy and create a clipping mask by going to the layer drop down menu and clicking create clipping mask and select the word america with the american flag clipping mask. return to the other piece.
then what you do is you paste it then go to the 3D tab and click create extrusion from selected layer and tilit that a little bit and that is your 3D word america, then you go to the internet and find a pic of an eagle in fron tof the american flag, and you dowload it, copy it and paste it. then you create an extrusioon the same way as with the word anmerica and you adjust the eagle heart to where it looks like it is directly stancked on top of the word america , to do this you click the move tool and click the eagle heart, then you will see a thing that has a cube and arrows, you will drag and scale as you need to make it look like it does above. then you make the letter I with the american flag clipping mask on it and copy it and paste it onto your 3D piece, then you adjust it with the same tool as before to where it looks like it is stacked directly on top of that eagle heart you just applied, after making an estrusion for it of course. then you make another layer, and you go to the 3D tab and click on create mesh from preset and cread a cylinder, THEN AFTER THAT YOU adjust it to a small but tall size to where it resembles a flag pole, then merge the layer and place it next to your I love america thing, then you create a different mesh preset on a different layer and make a sphere, then you make that sphere like the little balls on top of flag poles on the top of the flag pole. here comes the tricky part, then you open up a picture of the american flag, then you make it ripple a little bit by going to the filter drop down menu and clicking destort and then click ripple and make it just the right amount of ripple to where it resemnbles a flag blowing in the wind. then after that you copy that and then paste it onto this 3d piece, after that you select create extrusion from selected layer and then merge it with the layer that has all the other 3 d things, then you adjust it with the tool from earlier to where it looks like it is a flag flying, and then you are done. Thank you goodnight.
my patriotic trib trib

Ok first you create a cliping mask of american flag with the map of the US as described on the first write up and then you you make text boxes that say the word above amnd put a rainbow gradinet on them and then what you do get a pic of a bullethole and then youo make it a brush and then use it as an eradser so the meraican fklag is seen in the backgorung
guitar explosion
for this one you must get a pic of a guitar with the american flag on it and then you must get a picture of a guitar pick and then open it up by hitting file then open and then you copy and paste it onto the file in which you have the american guitar and then you go to the 3d setting and then you click extrusion from selected layer, and then what you do is type on the pick "ninth grad comp d". after that you go to view dropdown menu and select timeline and create videotimeline and then click the three lttle squares and thats your first layer, after that you copy the layer that has the 3d pick and then what you want to do is move it by selecting the move tool on the left tool bar it will be the first one and then what you want to do is move it backand to the lft a little so as to look like the pick has just plucked a guitar string. then you downloas a picture off the internet of a sound wave little thing kind of like the wifi symbol and then you copy and paste it onto this piece and then you put an orange gradient on it and then give it a stroke by going to layer drop down menu and then going to layer styles and then clickng stroke make it look kinda small so as not to make it look rinky dinky. After that you create a new frame and then just revert to the old pick to where it originally started and to make the sound waves you just copy and paste it again but erase half of it and make it go farther in the same direction and put a stroke on that one, remember that you will be having to hide these things on the first frame and then unhide it on iots original frame. then yo do the same thing going in the direction until it goes off the picture, make sure you are coordinating the pick stuming wiht the sound waves moving on each frame, make sure you are doing the sound waves on both sides so it looks like they are casually running in the same direction off of the page.
Now what you do is put the pick all te way to the bottom of the strings and then select the cool little thing that looks like a blob on the left hand tool bar and then you click the one that looks like a thunder bolt and put it at the bottom of the pick so it looks like thunder struck and then you go to the layer drop down menu and select pattern overlay and then give it a cool little pattern on the inside and then give the thunderbolt a little stroke also. Make sure you are creating a different frame for every action.
Then click on the blob thing again and then select the thing that looks spikey and put it where the thundrebolt has struck and then put a pattern and a stroke on it. and you copy and paste that onto a different frame and then you keep doing that until it fills the whole icture and then you create a nother little spikey but put it in a ranbow gradient and then what you want to do is type kaboom and then skew it to wher it goes from small to big and then you just create a different frame for every time you adjust it until it goes off the page.
my man
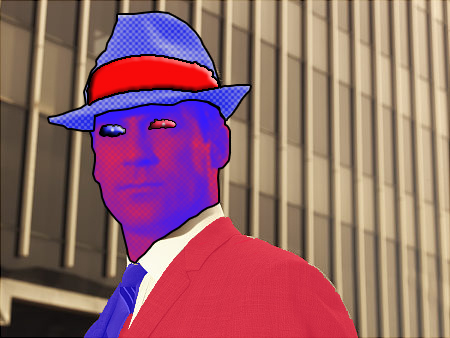
to do this you must get a picture of john hamm, then you open it up in photoshop and then you use the pen tool, the one on the left hand toolbar to select the band around the mans hat, then when selected go to edit>fill and then press color and then select red, and WAIT, before you fill it with red you have to press ctrl>j and then it should be just the band on a different layer, you will be pressing ctrl j after you select everything, then you go to layer layer styles and then bevel and emboss to make the band look a little shiny, then what you do is select his whole hat and make sure your foreground color is blue and the other white, and press ctrl j again but put the hat lyer under the band so it does not interfere, then what you do is go to filter drop down menu and select filter gallery and select the halftone pattermn using dots, sometimes you have to do it several times for it to look good. then you continue to fill these things like his face with a halftone pattern and you use red and blue instead of blue and white, then ince you do his clothes, you do his clothes by selecting his clothes with the select tool or the pen tool and then you ctrl j it when its selected and then you fill it with red or blue but actually go to the red part and then set the eraser to 50 percent and then erase it and then it should look semireal and then what you want to do is fo to his eye and pen tool it out and then once that is done, you select it and fill it red or blue and ctrl j of course but make sure to put a bevel and emboss on it and then get the brush tool, the one that looks like a brush on the left hand tool bar and then what you want to do is get jsut the plain circular brush and then put it where his pupil should be. and then what you want to do is make sure your putting strokes on everything and then you should have something like this and if you think and believe you will achieve and everything will be swell, and all the ladies will love you adn you will e seen as a complete ballerfic baller who balls all the time.
3d america
for this you hcae to make a cliipping mask of the american flag over the map of the united states and then you make a 3d extrusion of it and then what you have to do make a cylonder extrusion of a cylinder and then place it where san antonio is and then do that wioth the thing that yoiu click anhd then you adjust and rotate it as you place it in la and then type it and go to 3d and then extrusion from layer and then do that for each cylinder as you you placwe them in different places on the us map as you change the color of the text and place the cylnders in different places and then type that city also. wiengerver missipisop ohio texas appy texaf gevas vegas las yah great miutae for this you hcae to make a cliipping mask of the american flag over the map of the united states and then you make a 3d extrusion of it and then what you have to do make a cylonder extrusion of a cylinder and then place it where san antonio is and then do that wioth the thing that yoiu click anhd then you adjust and rotate it as you place it in la and then type it and go tofor this you hcae to make a cliipping mask of the american flag over the map of the united states and then you make a 3d extrusion of it and then what you have to do make a cylonder extrusion of a cylinder and then place it where san antonio is and then do that wioth the thing that yoiu click anhd then you adjust and rotate it as you place it in la and then type it and go tofor this you hcae to make a cliipping mask of the american flag over the map of the united states and then you make a 3d extrusion of it and then what you have to do make a cylonder extrusion of a cylinder and then place it where san antonio is and then do that wioth the thing that yoiu click anhd then you adjust and rotate it as you place it in la and then type it and go tofor this you hcae to make a cliipping mask of the american flag over the map of the united states and then you make a 3d extrusion of it and then what you have to do make a cylonder extrusion of a cylinder and then place it where san antonio is and then do that wioth the thing that yoiu click anhd then you adjust and rotate it as you place it in la and then type it and go tofor this you hcae to make a cliipping mask of the american flag over the map of the united states and then you make a 3d extrusion of it and then what you have to do make a cylonder extrusion of a cylinder and then place it where san antonio is and then do that wioth the thing that yoiu click anhd then you adjust and rotate it as you place it in la and then type it and go tofor this you hcae to make a cliipping mask of the american flag over the map of the united states and then you make a 3d extrusion of it and then what you have to do make a cylonder extrusion of a cylinder and then place it where san antonio is and then do that wioth the thing that yoiu click anhd then you adjust and rotate it as you place it in la and then type it and go tofor this you hcae to make a cliipping mask of the american flag over the map of the united states and then you make a 3d extrusion of it and then what you have to do make a cylonder extrusion of a cylinder and then place it where san antonio is and then do that wioth the thing that yoiu click anhd then you adjust and rotate it as you place it in la and then type it and go tofor this you hcae to make a cliipping mask of the american flag over the map of the united states and then you make a 3d extrusion of it and then what you have to do make a cylonder extrusion of a cylinder and then place it where san antonio is and then do that wioth the thing that yoiu click anhd then you adjust and rotate it as you place it in la and then type it and go tofor this you hcae to make a cliipping mask of the american flag over the map of the united states and then you make a 3d extrusion of it and then what you have to do make a cylonder extrusion of a cylinder and then place it where san antonio is and then do that wioth.
