For my computer design nine week project.
Open a new picture that is 5 inches tall and seven inches wide.
1. You take a background color, by going to the little squares on the left side tool bar, and click on the color you want. in this case blue. then fill in the background by pressing control+backspace,
2. make a foreground color, by going to the color square on the top of the other square, use the rectangular marquee tool to make a josef albers like piece, making an inner square inside the blue rectangle. when you see that the rectangle you made with the rectangular marquee tool is selected, you go to the edit drop down menu, on the top tool bar, it should be the one that says edit, and click the fill button, then fill it with green. To make letters you must go to the text box, the capital letter T on the left side tool bar, and make a box where you would like the letters to be by left clicking and dragging the text box downwards and to the right, type the letter "C" then drag the bottom right anchor point to the very end corner of the letter,.. To make the text bigger you have to press control+t and adjust the size to any size you want( make sure to always click the check button when you are done adjusting it, if you need to cancel, press the button to the left of the check, this will cancel any adjustments you've made.) Make a new layer by pressing the button on the bottom right hand corner that looks like a square with the corner folded up.
3. keep making DIFFERENT LETTERS on DIFFERENT LAYERS and once you've typed "computer design", you make a blank layer. leave it alone. Don't add anything on to it.
4. Then use a picture of a contour drawing of a mouse, that you got off the internet and downloaded and opened by going to file>open>name of what you downloaded it with. magic erase all of the white portions, by clicking on the eraser button on the left hand tool bar and clicking the magic erase tool.. then create a brush by going to edit drop down menu then going to define brush preset.
5.
6. Add a layer that comes after the the blank frame then copy the layer before the blank layer by pressing control j while on the new layer. then type "back again" beside the mouse and on a different layer type 3.14 apple pi under computer design. because the mouse shows up again and he's back again.
7. Then create a timeline by going to the windows drop down menu and at the bottom there should be a button that says timeline, click on it. After you do that, click add video timeline, look at the bottom left corner of the timeline menu and click on the three little squares they are going to be in the bottom left.
8. Then click on the add new frame button, it will be right next to the trash button and it looks like a square with the corner folded up. Then click on the first layer,
and hide all the layers above it so it will be the only thing on that frame. Then click add new frame again and click on the second layer with the first layer with letters on it and make sure you keep all the layers underneath so you can see all the layers underneath it. Keep repeating this process until you get to the blank layer. When you get to the blank layer you add new frame, click on the blank layer, and hide all of the layers underneath so there is nothing on the screen for a short amount of time, then click on add frame, and un-hide all the layers including the layer with "back again" and "3.14 apple pi" and you should have all the layers on that one frame for the gif. click on forever so it will run forever. set all of the frames to .1 seconds, except for the blank frame and the last frame, set those to one second
When you are done, you go to file>save for web> and make sure you save it as a gif. THIS STEP IS VERY IMPORTANT, IF YOU DO NOT SAVE FOR WEB IT WILL NOT UPLOAD AS A GIF TO THE INTERNET.
10. and then viola, your done.
NOTE, YOU TAKE A PICTURE OF YOUR SIGNATURE, WRITE IT IN SHARPIE, EMAIL IT TO YOURSELF. THEN OPEN IT UP IN PHOTOSHOP FILE>OPEN>WHATEVER YOU SAVED IT UNDER, OPEN USE THE MAGIC ERASE TOOL TO GET RID OF THE WHITE. EDIT>DEFINE BRUSH PRESET> AND APPLY IT TO EVERY FRAME OF YOUR GIF.
For my nine week project.
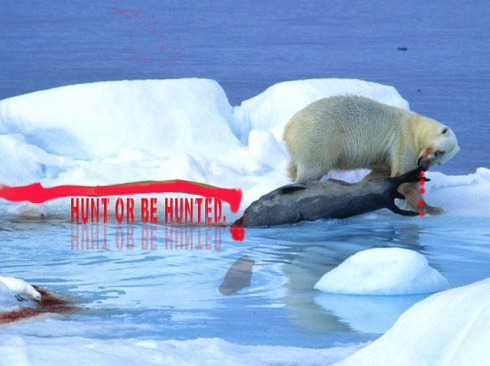
1. Download a picture of a bear and a seal and open it by going to File>open> and click on whatever you named that photo.
2. then you create a text box. type "hunt or be hunted" in all caps and drag the bottom right anchor point and then transform it and put it right along the water, so your reflection will look good.
3. Then you copy that layer, by pressing control j
4. Then you go to edit drop down menu MAKE SURE YOU ARE ON THE COPY LAYER, NOT THE ORIGINAL LAYER., then click on transform and flip the text 180 degrees.
5. Then use the move tool WHICH IS LOCATED ON THE LEFT SIDE TOOL BAR AND IT SHOULD BE ONE OF THE TOP BUTTONS, to move the text right along the edge of the water.
6. After you've done that you use the eraser tool to erase all of the upside down letters, BUT DONT PUT THE OPACITY TO 100% IT WILL COMPLETELY ERASE THE LETTERS, ADJUST THE OPACITY BY GOING TO THE THING ON THE TOP UNDER THE TOOL BAR, THAT SAYS OPACITY, ADJUST IT TO WHERE IT FADES IT OUT BUT DOES NOT COMPLETELY ERASE IT. you're goal is to make the letters look like a reflection in the water.
7. Then you make a brush out of a red tear. to do that you must get a picture of a red drop, dowload it , file >open, then use the magic eraser tool to erase the background to where the only thing left is the tear. Then go to edit, define brush preset. and you have a brush.
8. After you you do that, you go back to the bear picture, and go to the brush tool, which is located on the left hand tool bar and looks like a brush, select the tear drop, adjust the size and strength, then you put several drops coming out of the bears mouth so it looks like blood.
9. After that you must just rub that brush around, into a path so it looks like it is a path of blood from where the bear dragged it. YOU CREATE THE SMUDGE EFFECT BY DRAGGING THE BRUSH FROM SIDE TO SIDE WHILE HOLDING THE MOUSE DOWN. Then use the smudge effect on the seals open neck so it looks like it is bleeding from where its head came off. .
10 . then you get a photo from the internet of a seals head, right click the image, save image as, and save it under seals head. then go to photoshop and open up that picture by going FILE>OPEN>SEALS HEAD. and again use the magic erase tool on the head, EDIT>DEFINE BRUSH PRESET>. then go to the bear picture, and go to the brush tool, and select the seals head, there should be a color box at the top of the picture, make it brown so the seals head will be brown, then make it small enough so it looks like a seals head and click on EDIT>TRANSFORM> then rotate it to where it looks like the head is just randomly floating in the water, then apply the brush in the middle of the water, and like the letters, you erase it, but change the opacity so it looks like the head is under water.
11. get a picture of a contour drawing of a dolphin on the internet, save it open it and magic erase the white portions like you did with the mouse in the previous project, and make the dolphin a brush by going EDIT>DEFINE BRUSH PRESET. and go back to the bear picture, then click on the brush tool, and select the brush of the dolphin, make it REALLY, REALLY light so most people wont see it, but the people who do see it will get a pleasant surprise, apply it in the back section of water.
12. FILE>SAVE>UPLOAD TO YOUR WEBSITE.
13. viola your done.
3rd nine week projects.
First you take a pic of a spiral and then you select a small portion of one of the little portions of the spiral, then you press control j while it is selected and then go to that new layer and then go to Filter drop down menu and then press stylize and then press extrude, then instead of the default setting of block but instead set it to pyramids and make the size 10 instead. then you want to make a gif, by doing that you go to view and press timeline than create timeline then click the small 3 squares in the botom left corner of the timieline bar. then you have this as your first layer and then you continue to do that going farther and farther up the spiral, but make sure you create a new frame for every little portion and then go back to the fist frame and make sure it doesnt have any of the other slides and hide it by clicking the eye, and then unhide on its later so it is all normal. Then continue to do this going farther and farther up the spiral. And then once up to the end of the little tube you must put a new frame and then basically do everything backwards, so you start off by taking the last little portion and just erasing it opn a new frame, and continue until you have no extrusions on the spiral and make 2 new frames with just the picture of the spiral and nothing else. Then you create a new layer that is completely filled with black and pull up a bubble used in comics and go to the tool bar on the left and click on the little sploosh thing that looks like a little splatter and then click on it and click the little spikey thing. and then adjust it to size you like and then create a textbox on it saying bang and then you adjust the size and then click on the T on the hill on the top toolbar and then click the flag option and then put a stroke on it so it blends in better with the background. then make sure to highlight the bang and then make sure it is red by going to the color box and selecting red, then do the same things with the other slides and then change the colors to your liking. and then you should have a really good gif that should be really super attractive looking and you will be able to get a lot credit from your friends and they will think you are so cool and all the ladies will really really love you and think you are a true funny guy and a such baller that is very good at sports and school and such things that will make you seem like a true ballerific baller.
BALL FALL
ok so first you want to make a poic that is 5 by 8 and your gonna want to have your foreground and background colors as red and blackl , then you go to filter>filter gallery and then clck dots then you geta pic of balls in a hand off the interwebs and then you have that and you go to the window drop diown menu and then you select timneline and you aer going to hit create video timelie and then yu select the three little squares that are on the bottom left corner of the timeline bar and you should just have that picture on one frame and then to make a new frame you go to the little square thing and this should aid you in your making.
a comment bubble from the same place as the spikey thing in the instructions on the previous project and then you want to make the frames of the gif counting down and then you get a hand off the internet that is open and then yopu have a pic of the balls mid air and then you make a different frame but make it with a blank layer but put a blue and yellow gradient by going layer layer styles and then gradeint over lay and then you have the alls getiing decreasingly smaller on each frame, to mae thses frames you click on the new frame burttin that looks liek a folded square and then you have to go to the first layer and hide it but go back to the frame it was originalyl on and uunhide it so it is on its own frame and its own frame only. then once you have the balls so small they look like they could hit the ground you create a different frame with little blob from the same thing as the comment bubble which is the litle blob on the toolbar on the left side.
and then you adjust it to where the balls could've landed and then you out a rainbow gradient by going to layer, layer styles and selecting the gradient ovberlay and select the rainbow and put it at the angle that you think looks best. and then on the next frame you are to make the thing bigger and then type splat in red but you adjust the text by clicking on the t next to the color and then you just put different ones on it so it looks as if it is doing sort of a wavy motion and then you revise it and you should be all set.
